
Note: If you are new to the K2000 or are new to deploying images to Macs, I strongly suggest you also viewing Corey Serrins article related to imaging for both Windows and Mac systems. There is a 33 minute video session containing both environments. The Mac capture and deploy process described in the below steps are provided on the walk through video, showing you every step of the process which will help set you at ease for the task at hand. Here is the link to Corey's article:
http://www.itninja.com/blog/view/kace-native-imaging-toolkit-k2000-v-3-4-only
Prior to starting the process of capturing a Mac image from a system, please make sure you are on the latest version of the Mac OS X for the system and also have the latest Macintosh CD. Only version 3.4 on the KBOX supports Lion (Mac OS X 10.7) so if this is the version you plan on capturing, please make sure the K2000 is on version 3.4.
If you plan on using the captured image on different platforms of Mac, then it is also recommended to run a clean up script on the machine you plan on capturing the image from that will remove the cached KEXT files associated to the Mac OS X and its current system. Click Here to view an example of this type of clean up script. When the image is ready, follow these steps:
- Log in to the K2000 appliance.
- Click Library>Download Manager.
- Click Download for Mac OS X.
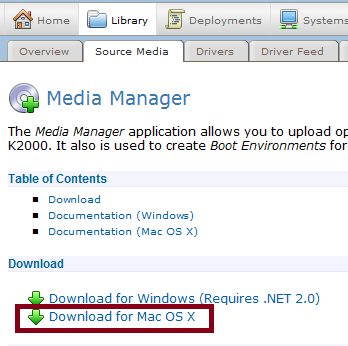
- Install.
- Insert the Mac OS X installation CD, but close out the installation pop up window.
Then next process is to build a Netboot environment. To do this, follow these steps:
- Log in as admin to the Mac OS X system you plan on capturing the image from. The Mac OS X system must be on the same subnet as the K2000.
- Open the Media Manager you just installed.
- Click the Create Netboot Image tab.
- In the K2000 Host Name field, enter the host name or IP address of the appliance.
- Browse to and select the Mac OS X installation disc.
- In the NetBoot Password field, enter the VNC-Remote Control Application password.
- Confirm password.
- Click Start Build.
When this completes, the NetBoot environment can be found on the Source Media and Boot Environments page. To enable and configure the K2000 appliance NetBoot server, follow these steps:
- Log in to the K2000 admin console.
- Navigate to Settings & Maintenance>Control Panel>Network Settings.
- Click Edit.
- Click the Enable NetBoot Server (for Mac OS X client) check box.
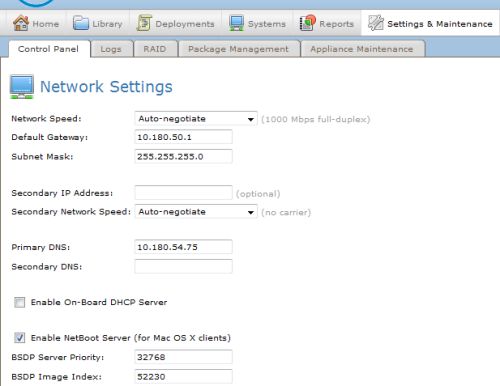
- After making this selection, two BSDP field boxes will appear. Set the BSDP settings. (The settings used in the above screenshot are examples)
- Save.
The next step requires working with both Pre/Post install tasks. By default, there are some canned Pre/Post install tasks provided within the K2000 in relation to Macs. However, custom Pre/Post install tasks can be created if a canned version is not available for the task you need to be performed during the image process. To setup the Pre/Post install tasks, follow these steps:
- Log in to the K2000 admin console.
- Navigate to Deployments>System Images. Your newly created system image will appear here. Select it. A System Image Detail page will appear.
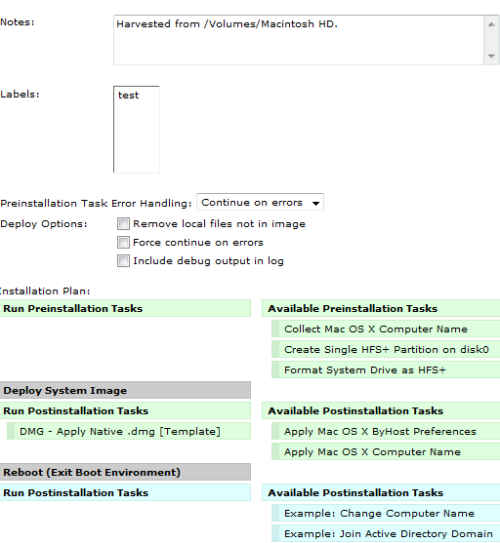
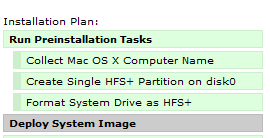
- Drag and drop your Pre and Post installation tasks from the right columns to the left columns in the order of which you want the tasks to take place. If you are only planning on using the default Preinstallation Tasks given, the order must be:
- Save.
(optional) If you plan on creating custom Pre/Post installation tasks, follow these steps prior to adding them to the order on the System Image Detail page:
- Log in to the K2000 console.
- Navigate to Library and select either the Preinstallation Tasks tab or the Post Installation Tasks tab.
- Select Choose Action>Add New Shell Script.
- Based on the tab chosen either a Preinstallation or Post Installation Task Detail page will appear.
- Glance over to the right side of the page (often overlooked). Information in creating a custom pre/post installation task is not found in the manual but is found in this section. The right side discusses where to find documentation related to creating a custom task.
- By default, your shell script must begin with #!/bin/bash. Build the rest of your custom script based on the tutorial content found from the link provided for Bash Programming.
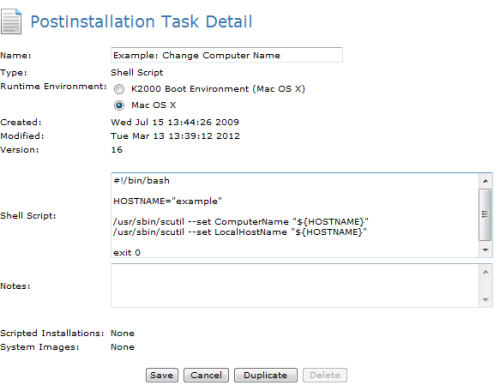
- Whe finished with the shell script, save it. Then switch back over to your System Image Detail page to find your custom task. Below is an example of a Custom Post Installation task for changing the computer name after they system has been imaged.
NOTE: Custom Pre/Post installation tasks are normally not a supported feature provided by KACE Support. KACE Support will attempt best effort in trying to resolve an issue with a custom designed Pre/Post installation task, however if you want KACE Support to create one for you then this type of service request would be handled by Dell KACE Pro-Services.
Now you are able to NetBoot and image a Mac system. If you would like to view the image process from start to finish, press CMD and V (verbose mode)on the Mac in question. Click Here to view other articles related to the above information and troubleshooting NetBoot/Imaging issues.
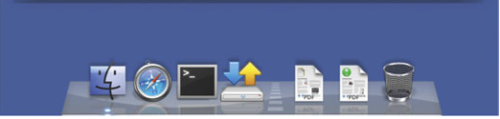
To capture the image, NetBoot the Mac unit you plan on taking the image from. It will bring you to what would look like a very basic user interface with a very small number of choices on a Dock.
Click on the K2000 Image Utility App in the Dock to launch the application and the utility will appear.
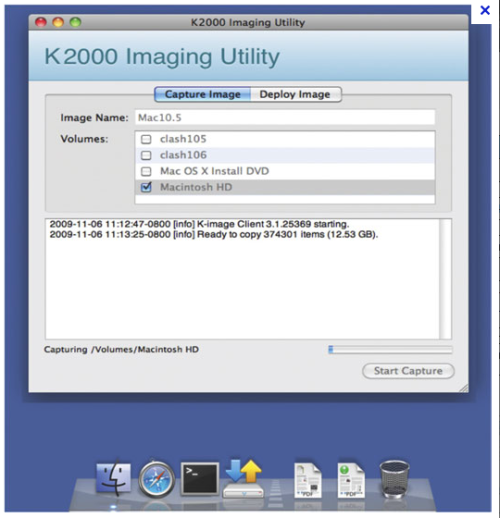
Select the Capture Image tab in the utility. Select the appropriate volume to capture (most often Macintosh HD) and select Start Capture in the bottom right corner. When complete, the image is now ready to deploy. To deploy the image, NetBoot the Mac unit(s) you would like to deploy to. Access the same utility only select the Deploy Image tab.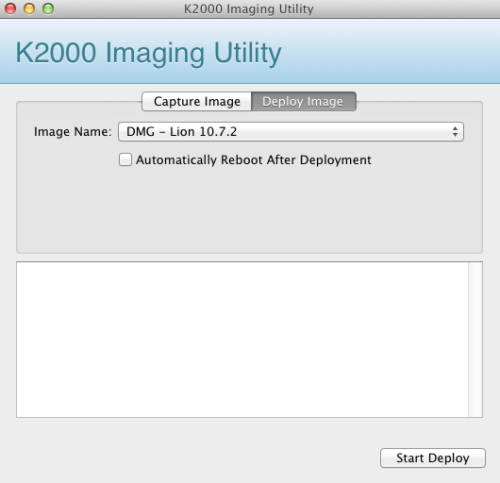
NOTE: Not all Mac systems can be upgraded to Lion (10.7.X) if you are in fact trying to image an older Mac computer with Lion. Make sure the Mac system meets the requirements found in this article that Apple has made available on their website. Click Here

It's updated now with the capture/deploy information.
Thanks,
Brian - brian_klocek 11 years ago
http://support.apple.com/en-us/HT201372 - Eddie_Seelke 9 years ago