
Creating a driver installation in an MSI can be a challenging task. One of the more popular methods to achieve this is to use Microsoft's Driver Installation Framework (DIFx).
Microsoft provides documentation on DIFx, however it is limited and doesn’t provide any examples.
This article provides a step by step working example of how to achieve this task. For this purpose, we are going to create a Windows XP installation for a Signed Driver: ‘Synaptics Touchpad’ with Wise Package Studio.
Step by Step - Creating a driver installation with DIFx using Wise Package Studio
1. Create a new Windows Installer (WSI) file
Work bench –> Tools–> Windows Installer Editor
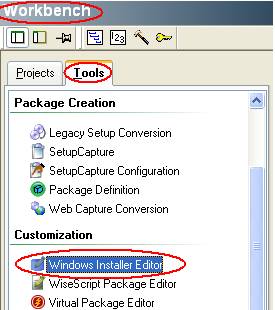
If you do not get the ‘New Installation File’ window shown below, select File –> New from the main menu inside Windows Installer Editor
(by default, the last edited .WSI file will be opened).
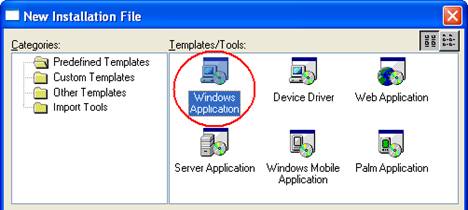
Select Windows Application
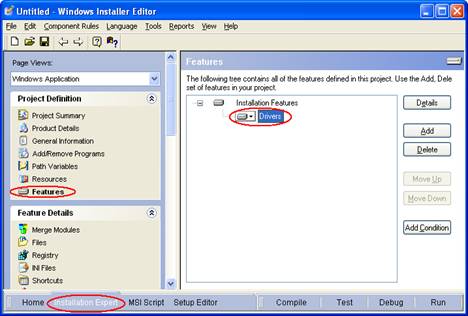
Inside Installation Expert, complete the relevant fields under Product Details and General Information

As this will be a Driver only installation we are renaming the default Wise feature from ‘Complete’ to ‘Drivers’.
Note: If your own installation is to also contain non driver files (e.g. captured application files). Ensure there is a SEPARATE feature which will contain these.
Installation Expert –> Features
Rename the default feature from ‘Complete’ to ‘Drivers’
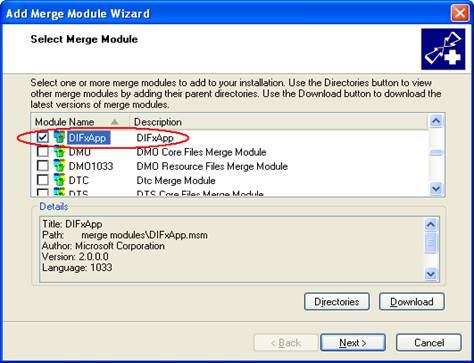
2. Next, we add the DIFxApp Merge Module to the ‘Drivers’ Feature
Merge Modules –> Add
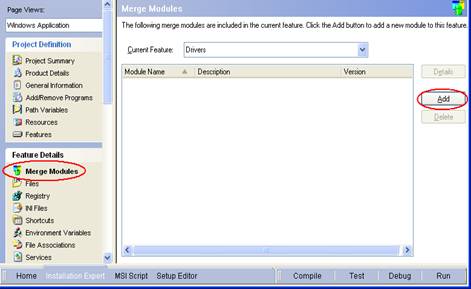
Select the DIFxApp Merge Module and click Next then Finish
(if the Module is not present select ‘Download’ then ‘Wise Web Site’ to obtain it)
Note: Make sure you are using at least version 2.0 of DIFxApp Merge Module.
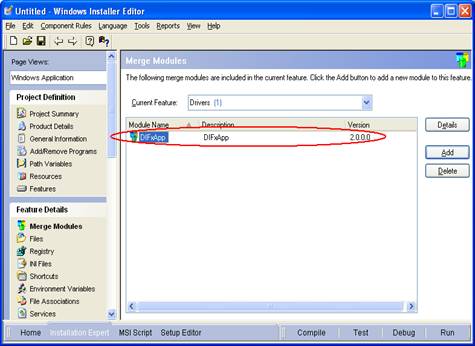
The DIFxApp Merge Module should then be visible.
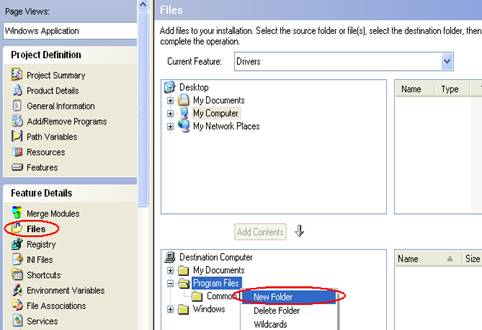
3. Create a folder EXCLUSIVELY for driver files.
Note: If there is more than one driver (not the case with our example), there must be a SEPARATE folder for EACH driver and associated files.
Open the Filesview, then in the bottom window Right Click on ‘Program Files’ and select ‘New Folder’
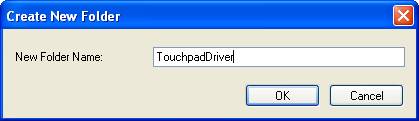
For purposes of our example, we are calling the new folder 'TouchpadDriver'
Name the folder and click OK
4. Add the relevant driver files
To save experiencing a common problem (this issue will be detailed later), ensure the synpd.inf file is added FIRST. Doing this step ensures the .inf file becomes the KeyPath for the component to contain the driver files.
Highlight the ‘TouchpadDriver’ folder in the bottom left window, then select ONLY the synpd.inf file in the top window and click the Add File button.
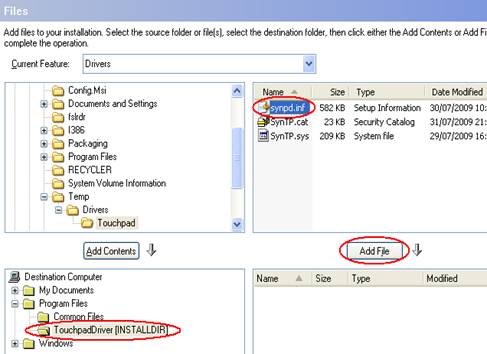
The synpd.inf file should be visible in the bottom right window as shown below.
Next, add the remaining files to the ‘TouchpadDriver’ folder:
Check the ‘TouchpadDriver’ folder is highlighted in the bottom left window, then select the remaining files in the top right window and click the Add File button.

Tip: Some drivers have several different folders containing the relevant files. If this appears to be the case, check the entries of the .inf file to see if there are references to files in a subfolder(s).
If so, you may need to modify the file path entries in the .inf file, to allow all the files to be in ONE root folder.
All files for a specific driver need to be in one root folder along with the .inf file for a successful installation via DifX.
5. Configure Driver Installation Options
Double click on the synpd.inf file in the bottom right window to set driver options.
Installation Expert –> Files –> synpd.inf
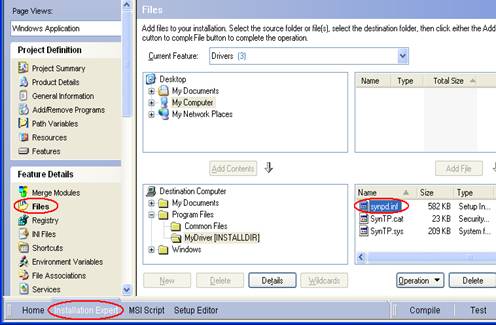
Select the Driver tab
What to do if there is no Driver tab
Note: If the Driver tab IS present, skip to the next section: ‘Configure Driver Installation Options (Continued)’
This is a common problem with a relatively straight forward solution.
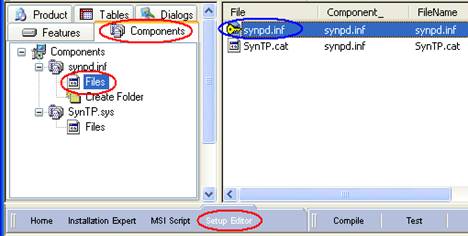
Open Setup Editor from the bottom of your screen and select the Components tab at the top of the left window.
Expand out each component in the left window and look in the relevant Files section until you find the synpd.inf file.
In our example below, the component containing the .inf file is called synpd.inf. We can see that there is a small yellow key icon beside the in the synpd.inf file in top of the right window.
This means that the file is the KEYPATH for the component it is in.
Setup Editor –> Components
If the yellow key is NOT present beside the .inf file then it needs to be enabled:
Right Click on the synpd.inf file and click Set as Key

Note: If you are familiar with using the MSI Tables, the same as above can be achieved there: Reference synpd.inf in the File table to find the relevant component name.
Then, edit the KeyPath of the matching entry in the Component table.
Configure Driver Installation Options (Continued)
Under the Driver tab, ensure the ‘Use DIFxApp to install this driver file’ option is enabled.

Enable the DIFxApp Installation Options to meet your preferences (these are described below).
DIFxApp Installation Options
Retain better-matching Pnp function drivers
Enabling this option will keep an existing Plug and Play driver on the computer if it is seen to be a better match (“better match” means if there is a signed and/or newer driver already on the computer this will be retained and the driver in this installation will not be installed).
If you clear this checkbox, the installation's driver will be installed and over-ride any existing driver on the computer.
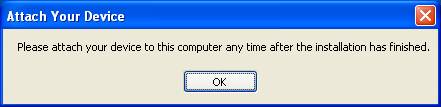
Prompt for missing device
Enabling this option gives a prompt and the end of the installation. This will occur if the matching device to the driver is NOT connected to the computer.
Note: Even if this option is enabled, the prompt will NOT appear under a silent install.
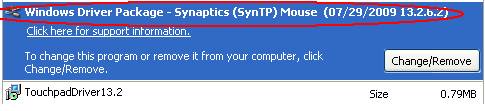
Create entry under Add/Remove Programs
This will add an entry under Add/Remove Programs for the driver(s) installed in ADDITION to the standard entry for the MSI installed.
Configure the above DIFxApp Installation Options to your preferences then click OK to confirm.
OS Specific Launch Condition
Once all the steps above have been completed, consider what version of OS the driver is intended for. An ‘accidental’ rollout of out a Windows XP Driver Package to a Windows 2000 PC may not give very desirable results!
The best safeguard is to condition the installation so it will only install on the intended OS.
This can be achieved through setting System Requirements.
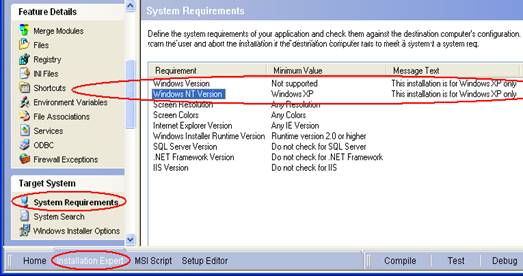
Under Installation Expert in the left window select System Requirements.
The relevant options to configure are Windows Version and Windows NT Version. These are shown highlighted in the right window below. Double click to edit them.
In the case of our example our driver is intended for Windows XP, so we have set Windows Version (i.e. Windows 95, Windows 98 etc) to ‘Not supported’.
Also the Windows NT Version has been set to ‘Windows XP’.
The Message Text field defines the actual message to display if the OS Condition is NOT met.
Installation Expert –> System Requirements
Once this has been completed, compile your MSI and the Driver Package is ready to go!
Behind the Scenes - What's happening in the MSI Tables
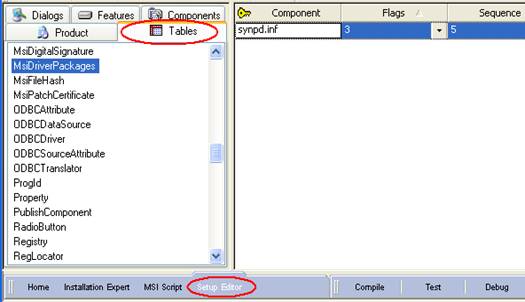
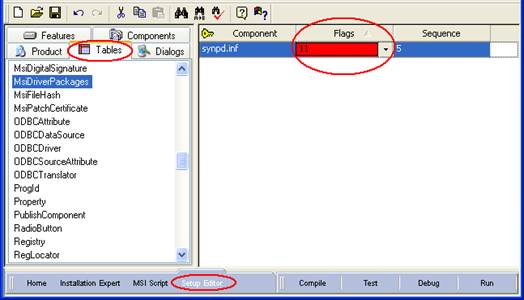
The key table involved for a driver installation using DifX is the MsiDriverPackages table. The use of each column is as follows:
Component
Should have the name of the component containing the .inf file for the driver.
Flags
A number which defines the type of driver to be installed, (Signed or Unsigned) along with the specific Installation Options.
Sequence
Controls then install order of drivers (if there is more than one driver, lowest number installs first).
Setup Editor –> Tables –> MsiDriverPackages
The following are common examples of values for the Flags column:
Signed Driver Installation
7 = Signed driver install (Standard install with no options configured)
6 = Signed driver install + “Retain better-matching PnP function drivers”
5 = Signed driver install + “Prompt for missing device”
3 = Signed driver install + “Create entry under Add/Remove Programs”
Unsigned Driver Installation
8 = Unsigned driver install (Standard install with no options configured)
14 = Unsigned driver install + “Retain better-matching PnP function drivers”
13 = Unsigned driver install + “Prompt for missing device”
11 = Unsigned driver install + “Create entry under Add/Remove Programs”
Note: Officially, the valid range that can be used in the Flags column is a number between 0 – 7.
Because unsigned driver installations are ‘unsupported’ by Microsoft, the range for unsigned driver installations is 8 and above. Any of these options will show up as a table error (in addition it will appear as an ICE error if a validation is run). This is normal.
Tip: For an unsigned driver installation you won’t be able to set the options via the interface in Wise (using the Driver tab of the .INF file). You will need to go into the MsiDriverPackages table and set the Flags value directly.
Author
Jeremy Boyes
February 2011

Apart from throwing ICE errors, it works just fine with unsigned drivers. Even better than using the DPInst utility. - akki 12 years ago
ICE errors? Box warning about the driver being unsigned or? Does the user has to interact with the error? - Erroneus 12 years ago
1. Why is this explained for Wise Package Studio? Since it's discontinued, wouldn't a tutorial using AdminStudio or something else be better?
2. This seems excessive for adding a simple driver. I like how Advanced Installer handles drivers:
- add the files to the project
- add the driver INF in Drivers page
- set driver options
- build the package - Cosmin Pirvu 12 years ago
You can find this info here:
www.flexerasoftware.com/company/newscenter/pressreleases/press-releases_pr2005_69.htm - akki 12 years ago