
Bomgar|KACE Integration 101 <--------Click to Download PDF *Updated* 9/26/2012
This is a comprehensive guide on how to easily integrate your Bomgar appliance with your K1000. This guide is for Admins who have purchased the Bomgar appliance and NOT a setup guide for a hosted account that comes with the two free licenses.
What is Bomgar?
Answer= A secure remote desktop control option for every computer in your organization. It is a physical appliance or a Virtual Machine. Licenses are based on techs logged into accounts that are created on the Bomgar Appliance.
After implementing the steps in this guide you will be able to launch the Bomgar Jump Client via a Machine Action or allow their Users to request a Bomgar Session via a KACE HelpDesk ticket that will show up in the Bomgar Queue.
System Requirements
Bomgar version 11.1 or greater
Dell KACE K1000 Management Appliance server version 5.2.38773; other versions may work but this is the tested version
Network / Firewall configured to allow:
HTTP/HTTPS connectivity from the Bomgar Appliance to the web server
HTTP/HTTPS connectivity from the web server to Bomgar Appliance
(Note: I had success integrating with KBOX version 5.3.53053)
Configure Dell KACE
In order to use the Bomgar Integration for the Dell KACE K1000 service desk capability, you must modify the ticket form and configure the ticket rules within the appropriate service desk queue as follows:
1. From the administrator KACE Management Center > Service Desk > Configuration, select Queues from the listed options.

2. Select your Service Desk queue by clicking on the name (e.g. Bomgar IT Help Desk, in this example).

3. Select Customize Fields and Layout. This will allow you to add the Bomgar Session Request field to the Ticket Form.

4. Scroll down to the Ticket Layout section, configure a custom field and label the new field, Bomgar Session. Choose the appropriate CUSTOM_# that is available in your environment. Set permissions to Owners Only - Hidden from Users. 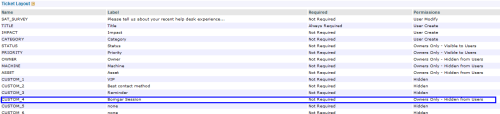
(Note: Jot down the CUSTOM_#. You will need this information in the future)
5. Once you save the custom field scroll down on the same page, change the Field Type of the custom field to Single Select, and change the Select Values option to Send Request. Leave the Default option blank. Scroll to the bottom and select Save.

(Note: The CUSTOM_#’s should correspond)
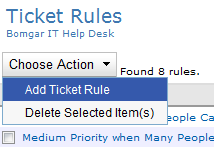
6. Once your changes are saved, you will be directed back to the Service Desk > Configuration page. From here, select Customize from the Custom Ticket Rules section. Select the Add Ticket Rule Action.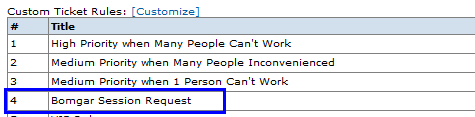
7. Define any criteria to create a dummy, or temporary Ticket Rule (which will later be changed in the SQL query) and select Next.
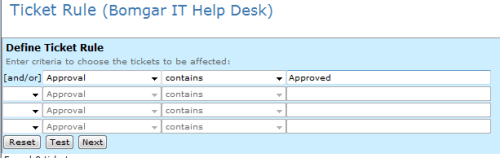
(Note: As a placeholder, you can use Approval - contains – Approved)
8. Similar to step 7, define the next items required with Define Ticket Rule, setting Priority and the Value, and select Done.

(Note: As a placeholder, you can use Priority - change value to – High)
9. Once you complete step 8, you will be directed to the Queue Rule : Edit Detail page. Now you should customize the queries and actions. In this example, the Custom Ticket Rule, Bomgar Session Request, is shown. Now you can customize the rule.
a. First, change the Title to Bomgar Session Request. Next, change the Frequency drop-down to on Ticket Save.
b. SQL Query Enable is enabled and enable Results are tickets, add a comment to each one. Insert the following text in the Comments: Bomgar session has been requested via email.
c. Enable Owners Only. 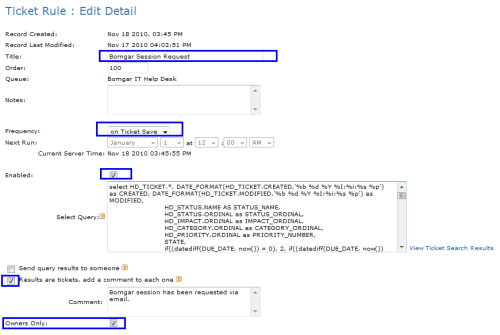
d. The Select Query area should contain:
// ------------------ COPY BETWEEN THESE LINES -------------------------
select
HD_TICKET.*,
owner.EMAIL as OWNER_EMAIL,
if ((LENGTH(owner.FULL_NAME) = 0), owner.USER_NAME, owner.FULL_NAME) as OWNER_NAME,
submitter.EMAIL as SUBMITTER_EMAIL
from
HD_TICKET
left outer join USER owner on owner.ID = HD_TICKET.OWNER_ID
left outer join USER submitter on submitter.ID = HD_TICKET.SUBMITTER_ID
where LENGTH(HD_TICKET.CUSTOM_FIELD_VALUE3) > 0
// ------------------ COPY BETWEEN THESE LINES -------------------------
////////////////////////////////////////////////////////////////////////////////////////////////////////////////////////////
Important Note:
{HD_TICKET.CUSTOM_FIELD_VALUE3, where 3 is calculated from:
CUSTOM_4 – 1 = 3 This is because the custom fields in the ticket layout start with the number 1, while the query variables start with the number 0.}
////////////////////////////////////////////////////////////////////////////////////////////////////////////////////////////
e. Enable the checkbox Send an email for each result row and modify the text to include:
· Subject contains Remote Support Invitation from YourServiceDeskName - [TICK:$id] : $title
· Email Column contains SUBMITTER_EMAIL
· Email Body should contain:
$owner_name would like to start a support session with you. To do so, please click on the link below and follow the online instructions.
https://YourBomgarURL.com/api/start_session.ns?issue_menu=1&customer_name=$submitter_email&external_key=TICK:$id
Bomgar enables a support representative to view your screen in order to assist you. Session traffic is fully encrypted to protect your system's data. Once a session has begun, you will be able to end it at any time.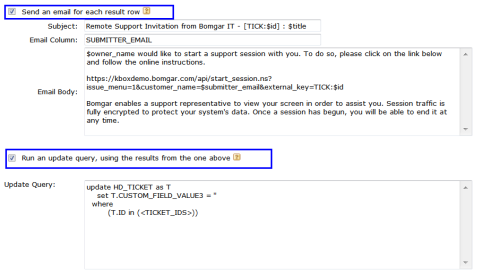
f. Within the Send an email for each result row section, make sure that:
· Subject contains Remote Support Invitation from Bomgar IT - [TICK:$id] : $title
· Email body contains:
$owner_name would like to start a support session with you. To do so, please click on the link below and follow the online instructions.
https://YourBomgarURL.com/api/start_session.ns?issue_menu=1&customer_name=$submitter_email&external_key=TICK:$id
Bomgar enables a support representative to view your screen in order to assist you. Session traffic is fully encrypted to protect your system's data. Once a session has begun, you will be able to end it at any time.
g. Enable Run an update query, using the results from the one above. The update query should contain:
update HD_TICKET as T
set T.CUSTOM_FIELD_VALUE3 = ''
where
(T.ID in (<TICKET_IDS>))
(Note: Be sure to use the correct CUSTOM_FIELD_VALUE identified in the earlier steps.)
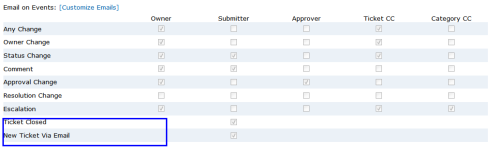
10. Now you need to customize the email notifications. Scroll down to the Email on Events: [Customize Emails] section from the queue edit page. The emails you are to customize are Ticket Closed and New Ticket via Email. Select Customize Emails.
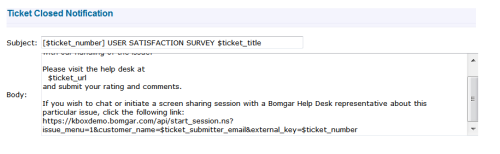
Scroll down to the Ticket Closed Notification and modify it, as shown below. Change the https://kboxdemo.bomgar.com to https://YourBomgarURL.com.
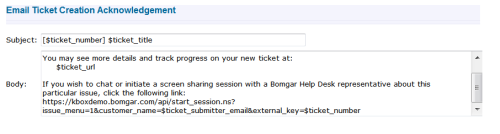
11. Also, change the Email Ticket Creation Acknowledgement. Change the https://kboxdemo.bomgar.com to https://YourBomgarURL.com.
Congratulations! You have configured your help desk to send the user a link via email to request a session after their ticket has been created!!
Let’s test it!
End User Initiated Request
1. Ensure a representative is logged into the Bomgar Representative Console to receive the incoming Bomgar Support Session request.
2. As the end user, send an email request to the address of your Dell KACE service desk (e.g. helpdesk@company.com).
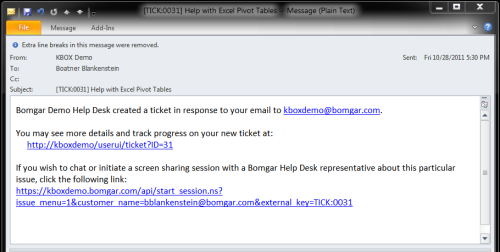
3. Look for the confirmation email indicating that your ticket has been created. Open this email, and select the link to start a Bomgar Remote Support Session.
4. Download and run the resulting Bomgar Customer Client executable.
(Note: If Click-to-chat is configured, the session will start instantly in Chat Mode in your web browser.)
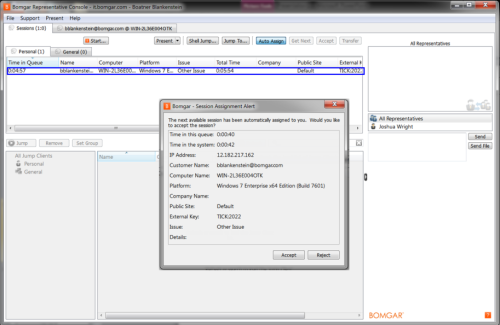
5. The representative should see the incoming support session request in the Bomgar Representative Console. Double-click to accept the session.
(Note: Configure Bomgar Equilibrium settings for the General queue if you wish to automatically distribute incoming sessions to the next available representative (Bomgar Enterprise licenses only).)
a. While in the session, click on the Summary tab and verify that the External_Key field was automatically populated with the ticket number.
b. Enter a couple chat messages.
c. Submit some session notes on the Summary tab.
d. If you configured the Representative Custom Link, select the Custom Link icon on the tool bar, in the Representative Console, to reference the corresponding ticket in the service desk.
e. End the session and close the tab from the Bomgar Representative Console to formally close out the session.
6. Refresh the ticket view to see the updated Bomgar session information. Make sure your email processor is set to process ticket update emails frequently.
Was it a success? If no email was generated for the submitter, check the syntax on your Custom Ticket Rule! :)
Also give the K1000 about 2 minutes to generate the email.
Unattended Support (Machine Action)
This section describes how to configure your Dell KACE environment to use “Machine Actions” to start a Bomgar unattended remote support session from the Dell KACE K1000 inventory feature. This will allow you to have fast, secure access to servers and desktops using Bomgar’s Jump technology. This patent-pending Jump technology is cross-platform and allows secure remote access to any supported system, even on remote networks. For more details about Jump technology, please see www.bomgar.com/docs.
Jump Clients can be pre-installed on any Bomgar supported client, including Windows, Mac, and Linux. You can either obtain a mass installer Jump Client using /login > Configuration > Jump Clients, or you can install a Jump Client one at a time from the Bomgar Representative Console during a support session. You can also use the push and start Jump function for windows systems; this is also described as a local jump.
(Note: The jump client needs to be installed on the machine you are trying to initiate a session with)
Using Unattended Support
Either of the following methods can be used with Dell KACE Appliance “Machine Actions” to Jump to a remote system.
Determine which Bomgar Jump method you will use (pre-installed Jump Clients, or the Jump-To / Push method).
From the Dell KACE Management Center select Settings > Machine Actions [Edit Mode]

Pre-installed Jump Client Method: To start a support session with a pinned or specific Jump Client, use the following API scripting command:
http://YOUR.BOMGAR.SITE/api/client_script.ns?type=rep&operation=generate&action=start_pinned_client_session&search_string=KACE_HOST_NAME
(Note: Only edit "YOUR.BOMGAR.SITE" in the API scripting command)
Jump-To / Push Method: To push and start a session with a Windows system within a local network, use the following API scripting command:
http://YOUR.BOMGAR.SITE/api/client_script.ns?type=rep&operation=generate&action=push_and_start_local&hostname=KACE_HOST_NAME
When either of these commands is executed a small .bcrs file is downloaded, and the Bomgar Representative Console launches and executes the Jump automatically.
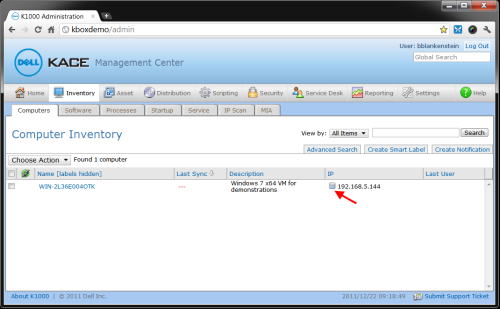
You can use the Machine Actions from the KACE K1000 inventory feature, as shown below.
Script to Install the Bomgar Jump Start Client
· In the KBox Inventory interface create a Smart Label. You can name this whatever you want but for this example we will use "Needs Jump Client"
· Then make a Smart Label using the following criteria:
o " Software Title"
o "Does not contain"
o "Bomgar Jump Client" or "Bomgar Jump Client [support.example.com]" (where "support.example.com" is your site name)
· Save the Smart Label and go to the Scripting tab
· Create a new script and set it for "Online KScript"
· Under Dependencies, add your Jump Client Mass Deployment file (If this is an MSI file, be sure you have the KEY_INFO string handy)
· Add a Task to "Launch a program..."
o Directory: C:\Windows\System32
o File: msiexec.exe (if an MSI file), or the Jump Client installer (if using EXE)
o Parameters: /qn /i "$(KACE_DEPENDENCY_DIR)\<Jump Client file name>.msi" KEY_INFO=<key info string from download screen>
(Note: Remove the <> from the parameters. The quotes “” stay and are important for the function of the script )
· Set "Limit Deployment to selected labels:" for the Smart Label you created
(Note: It is a Best Practice to run the script on a test machine before applying the label)
· Run the script as an Admin User for best results “Domain\Username”
· Set a Schedule for the script to run
At this point you should have a functioning deployment method for putting Jump Clients on computers that do not currently have Jump Clients installed. The premise being that the computer will check in and if there is no Bomgar Jump Client installed, KBox will apply the Smart Label to that computer. When the Script next runs for all systems with that Smart Label, a Jump Client will be installed thus removing the Smart Label since a Jump Client will be found based on the criteria stated above.
Additional Smart Label parameters and other options in the script may be added to further customize the deployment, but these are beyond the scope of this solution.

Comments