
 |
MSI
Custom Actions |
Many organizations utilize KiXtart scripts, and scripted or EXE compiled "wrappers" for their deployment operations. However, by using the facilities provided right within Windows Installer itself, you may accomplish everything from dropping a file footprint for inventory purposes, to using the existence of a file as a condition of installation. To take this even further, custom actions provide a means to kick off a customized script within the MSI installation process, even a full-blown scripted installation.
A Windows Installer custom action is a
user-defined process executed by Windows Installer during execution of a Windows
Installer setup (MSI). It may be a DLL call, VBscript, or any Executable file. This paper
describes the steps that may be taken in order to generate an MSI package using
Wise Package Studio that spawns a scripted installation using the familiar
KiXtart scripting language. This can be valuable in environments that rely on
Group Policy as their sole means of deployment (only MSI packages may be
deployed in such an environment). Additionally, KiXtart is a scripting language
that many systems administrators are familiar with. In this example we will use the Java
Runtime Environment setup as the custom action to install. However, the
procedure for any scripted installation or change would be similar.
1) Create JRE InstallShield answer file
2) Create EXE of KiXtart installation script
3)
Create MSI with custom action for deployment
Create Java Runtime Environment (JRE) Answer File
Legacy InstallShield setup files provide native support for the creation and use of an answer file that may be used to facilitate a silent application installation. The Java Runtime is such an installation. In this case, the answer file may be created using the following command line:
| c:\> \\server\package_share\jre\jre-1_2_2_011-win.exe -a -r -f1"\\ server\package_share\jre\setup.iss" |
More information on creating InstallShield answer files:
- See Chapter 4 of my free book, "The Definitive Guide to Desktop Administration" (RealtimePublishers)
- For supported switches click here
- For error code explanations click here
Sample setup.iss file contents:
| [InstallShield Silent] Version=v5.00.000 File=Response File [File Transfer] OverwriteReadOnly=NoToAll [DlgOrder] Dlg0=SdLicense-0 Count=2 Dlg1=SdAskDestPath-0 [SdLicense-0] Result=1 [SdAskDestPath-0] szDir=C:\Program Files\JavaSoft\JRE\1.2 Result=1 [Application] Name=Java Runtime Environment Version=1.2 Company=JavaSoft Lang=0009 |
Create EXE of KiXtart Installation Script
Using the KiXscripts Editor, the below script looks in a predefined variable used by its EXE packaged scripts named $EXECmdLine, which contains any command line switches passed to the EXE. If it contains "uninstall" an uninstall will be performed. The script will log actions or problems in the Windows Application Log. Upon installation, a shortcut is removed and the uninstall displayname value is cleared (to keep from having double entries in the Add/Remove Programs applet. Additionally, Sun has provided special switches to optionally specify the inclusion of Internet Explorer and Netscape plug-ins: to account for this the script checks for the browsers and the appropriate switches are specified. This script uses a UNC path to run the unattended installation from the network; you may also choose to include the installation files in the MSI package itself so that the installation does not need to go over the network.
Sample KiXtart Installation Script for JRE:
Next, using the KiXscripts Editor, create an EXE package using the "EXE Package Maker" feature. If KiX32.exe is not included on your target workstations, accept the default and include KiX32.exe within the executable package.
The KiXscripts Editor is available at http://www.kixscripts.com

Figure 1: KiXscripts Editor EXE Package Maker
Dialog (click for full view)
Note that the creation of EXE files from scripts within the KiXscripts Editor is a registered feature that is disabled in the demo version. Optionally, you may specify KiX32.exe as the executable and include the script within your package to be used as a command line parameter in your custom action. You may also specify CMD.EXE as the custom action executable and pass, "/c <path>KiX32.exe <path>jre_ca.kix" as a command line parameter. There are many possibilities, but a compiled executable is the easiest to implement.
Not familiar with KiXtart? KiXtart is a very powerful and easy to learn scripting language often used as a logon script processor. In most environments, it requires only a single executable to execute scripts with a wide range of functionality. A book on the KiXtart Scripting language is available at http://www.kixtartbook.com
Create MSI with custom action for deployment Using Wise Package Studio
- Launch Windows Installer Editor
- Press OK to Accept default from New Installation File dialog to create a new WSI project file with the "Windows Application" template. If this dialog does not present itself when launched, choose "New" under the "File" menu on the toolbar.
- Choose "Product Details" on the left pane and in the right pane enter a name for the product. In this case "Java Runtime Environment" and other details as desired. Although inconsequential to the actual execution of this MSI, a Default Directory should be specified. Click the "Change" button and accept "Program Files" as a default directory.
- Choose "Add/Remove Programs" from the left pane and in the right pane check the options for "Hide modify button" and "Hide repair button". Because this is a scripted installation, and not an MSI installation, these options will not be available. You may explain this using the "Comments" field as a message to users that may be looking for this functionality.
- Click the "MSI Script" at the bottom of the display to switch to the MSI Script view.
- Select the "Execute Immediate" tab at the bottom of the "Installation Sequence" frame.
- Scroll to the bottom of the script and click once to select the line just below the "InstallFinalize" Standard Action.
- From the action list on the left, double-click "Execute Program From Installation"
- In the dialog that appears, enter a name for the custom action (such as "InstallScript") and use the browse button to locate your EXE packaged KiXtart script. To ease future modifications to your MSI package, specify a resilient path for this file, such as a UNC path or consistently mapped drive letter.
- Select the "Properties" tab and change the default "Processing" selection to read, "Synchronous, Ignore exit code" and press "OK" to finalize the change. When you do so, the executable will be added to the packages resources. Along with several standard files use for the installation process itself, your script file may be seen in the "Installation Expert" view by selecting "Resources" on the left pane.
- As it is now, the script would run each time the MSI were triggered, even during uninstall. To modify this behavior, add a condition for this action by selecting the "Execute Program From Installation (InstallScript)" line and double-clicking "If Statement" from the left pane. For the "If Condition" enter the following: REMOVE <> "ALL" and click "OK". Next, select the line below "Execute Program From Installation (InstallScript)" and double-click the "End Statement" item from the Actions list in the left pane.
- As it is now, the script will run the custom action during installation, but will not run at all when uninstalling the MSI. To take uninstall into account, you may copy and paste the three new lines we have added (the If statement, the custom action and the end statement) and paste them immediately below the existing entries so that the three statements appear twice. In the second copy double-click the first line and change the condition to read: REMOVE = "ALL" Next, double-click the "Execute Program From Installation (InstallScript1)" line and change the name of the custom action to something more descriptive (such as "UninstallScript") and in the "Command Line Arguments" field enter "uninstall". You could optionally have a second script for removing the software, but in this example we have taken advantage of the KiXscripts Editor's ability to handle command line switches and incorporated both actions in one script.

Figure 2: MSI Script View of custom action
entries (click for full view)
- Because your MSI package must contain some file to meet
Windows Installer requirements, lets include an INI file that records the
installation date and time:
- From the "Installation Expert" view, choose "INI Files" in the left pane.
- Select the "Program Files" folder and press the "New File" button.
- For "INI Filename" enter "ScriptedInstalls.ini" and for "INI Settings" type "[Installed Scripts]" on the first line for a section name, and then "[ProductName]=[Date]" on the next line which are properties that will be interpreted by Windows Installer (for example, "Java Runtime Environment=4/28/2003").
- By keeping this dynamic, you may choose to enter the same INI file entry in all your packages for an additional method of tracking package installations.
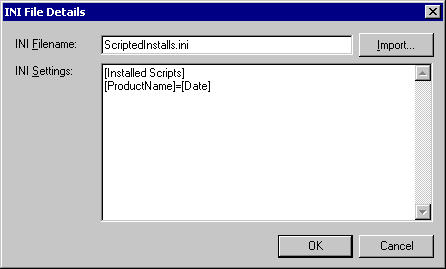
Figure 3: INI File Details Dialog
- Save the WSI project and give it a short, but descriptive name, such as "JRE12.WSI".
- Press the "Compile" button at the bottom of the display to generate an MSI file in the directory specified for the WSI file entered in the previous step.
In Add/Remove Programs you will see the Change button disabled and no specified file size. If you click on the "support information" link you will be presented with more specifics, including the comment information you may have included as shown in figure 4 below.

Figure 4: Add/Remove Programs View of a
Scripted, MSI-Triggered Installation (Click
for full view)
Bob Kelly
iTripoli, Inc.

Comments