
K2K - What can I gain by using Sysprep and how can I use Post Install tasks on images?
Answers (4)


I use the KISS (keep it simple stupid) method for building system images or scripted images. Basically I let the K2 build me a answer file and then copy that file in a answer.xml file for sysprep under c:\windows\system32\sysprep. You can put the answer file under c:\windows\panther directory and point sysprep.exe using command prompt to the answer file. Example: sysprep.exe /generalize /oobe /shutdown /unattend:c:\windows\panther\answer.xml .
There are some really smart people using itninja so please don't paste information including serial keys other information that could be used illegally in the comments.
But yes to answer your question its always a good idea to sysprep images that way the misc. data will get cleaned up and not polute other images or scripted images. Purchase the Microsoft Windows Desktop Administrator book and watch some youtube videos for better understanding of whats going on. System imaging can be a bit confusing if this is your first time messaging around with it. I would build scripted images and see how that works and then go from there using some of the information that you find on itninja.
Here a how-to I wrote on imagex.exe when using system images when you get to that point. Make sure you download WAIK from Microsoft.
http://www.itninja.com/blog/view/using-imagex-exe
Cheerio
Comments:
-
Thanks for the reply. The panther directory suggestion for the answer file may prove helpful. I'll test it out shortly.
I've used SI's since 2009 as noted in my OP because of the various hardware we have, but we have multiple buildings on and off campus with different Help Desk techs supporting each area. They've been using the Ghost images I built between 2004 and 2008, but were apprehensive about trying the SI's in Kace. Once they started using them, all was good, but we got a new contract with new techs and the consensus was to use images to handle the approx 10 different hardware models we have even after I explained the benefits of SI's a few times.
They built so many images with Kace agents already installed that it ate up my K2000 space and broke the agents on those images. So I figured I'd setup an imaging method that would make them happy and I'm very close to complete with SMal's method. The offboard images do seem to capture and deploy much faster given our pipes on the storage server.
With the method SMal suggested, we can keep a master image that deploys to various hardware and our techs can run Windows Updates on that master whenever they want without having to update 10 total images. :-)
I'm getting closer. Just a few bumps to get over I believe. Thanks again. - murbot 9 years ago


If you want to change existing wims use either Imagex or dism to mount and edit.
Syspreping does a couple of important things. MS say it regenerates the sid. This is important if you are using wsus to update. It also generalizes the hardware so when you cast the image to different machines the proper drivers can be discovered. The third thing which is most important to us at the college is you can create a user profile and tweak the software settings and browsers to what you want to user to experience and sysprep then copies those settings to default. When a user logs in they get a new profile on the machine and it is already configured how IT wants it to be. I have 90 windows images stored in kace (I build my images based on software licenses not hardware)
My experance with SI vs Images post tasks is most of them will work with either. Some have to be unique because a new install vs a sysprep does vary slightly. The hardest part of sysprep is getting a good working answer file. I do have some older blogs on imaging you can find, I plan on creating updated ones after I return from Dell World.
http://www.itninja.com/blog/view/setting-up-custom-logon-background-wallpaper-and-user-icon-for-a-windows-7-image
http://www.itninja.com/blog/view/windows-7-image-process-for-the-college-s-classrooms
http://www.itninja.com/blog/view/creating-a-windows-7-sysprep-image-without-having-to-install-any-drivers-at-post-install-tasks
http://www.itninja.com/blog/view/run-batch-files-or-apps-after-kace-k2000-3-6-is-done-with-it-s-post-imaging-tasks
The kace agent can be installed on an image prior to capturing, but if you do that you must delete the id keys in the registry. Even if you had the agent on the image and uninstalled it prior to syspreping you must remove the id keys in the registry or all machines will have same kace id.
I use a batch file prior to call the sysprep command that does some house cleaning prior to sealing the image.
Rem: this is the sysprep batch file.kace.reg
start /wait notepad c:\windows\w2d\tmccimageversion.reg
start /wait mspaint C:\Windows\System32\oobe\info\backgrounds\backgrounddefault.jpg
start /wait Reg.exe delete HKCU\Environment /v Building /f
Reg.exe delete HKCU\Environment /v Room /f
Reg.exe delete HKCU\Network\x /f
reg.exe delete "HKLM\SYSTEM\CurrentControlSet\Control\Session Manager\Environment" /v Building /f
reg.exe delete "HKLM\SYSTEM\CurrentControlSet\Control\Session Manager\Environment" /v Room /f
reg.exe delete "HKLM\software\microsoft\windows nt\currentversion\winlogon" /v defaultdomainname /f
regedit /s c:\windows\w2d\sus.reg
regedit /s c:\windows\w2d\kace.reg
regedit /s c:\windows\w2d\ip6kill.reg
regedit /s c:\windows\w2d\tmccimageversion.reg
cd\windows\system32\sysprep
sysprep /generalize /oobe /shutdown /unattend:acadf14cpnname.xml
Windows Registry Editor Version 5.00Academic sysprep answer file:
[HKEY_LOCAL_MACHINE\SOFTWARE\kace]
"InstallId"=-
"MachineId"=-
[HKEY_LOCAL_MACHINE\SOFTWARE\dell\kace]
"InstallId"=-
"MachineId"=-
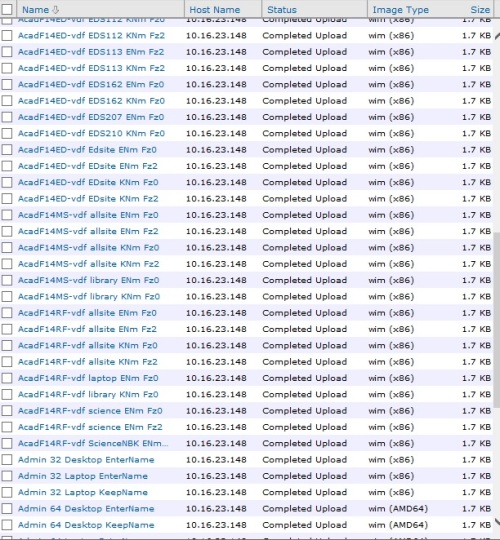
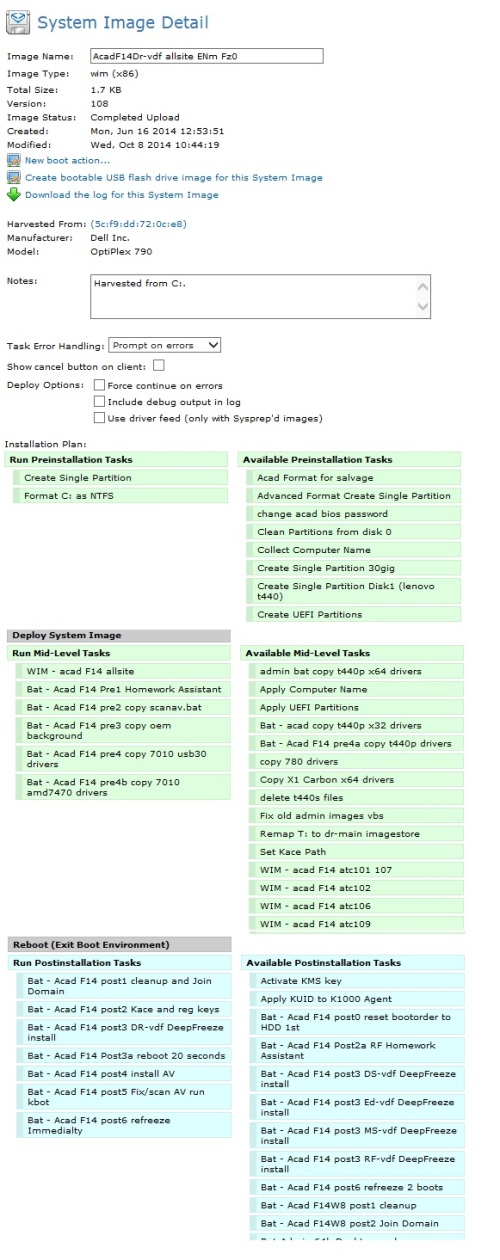
<?xml version="1.0" encoding="utf-8"?>Note: I store my wims on windows shares that is why there is a mid level task to cast the real image. All my captured images are just shells with no files to use as the template to image to. Otherwise the tasks will work with standard wim images. If you look at the image size you see they are only 1.7 k in size (formatted boot info).
<unattend xmlns="urn:schemas-microsoft-com:unattend">
<settings pass="specialize">
<component name="Microsoft-Windows-Deployment" processorArchitecture="x86" publicKeyToken="31bf3856ad364e35" language="neutral" versionScope="nonSxS" xmlns:wcm="http://schemas.microsoft.com/WMIConfig/2002/State" xmlns:xsi="http://www.w3.org/2001/XMLSchema-instance">
<RunSynchronous>
<RunSynchronousCommand wcm:action="add">
<Path>net user administrator /active:yes</Path>
<Order>1</Order>
</RunSynchronousCommand>
</RunSynchronous>
</component>
<component name="Microsoft-Windows-Shell-Setup" processorArchitecture="x86" publicKeyToken="31bf3856ad364e35" language="neutral" versionScope="nonSxS" xmlns:wcm="http://schemas.microsoft.com/WMIConfig/2002/State" xmlns:xsi="http://www.w3.org/2001/XMLSchema-instance">
<CopyProfile>true</CopyProfile>
<ShowWindowsLive>false</ShowWindowsLive>
<TimeZone>Pacific Standard Time</TimeZone>
<ProductKey>33PXH-7Y6KF-2VJC9-XBBR8-HVTHH</ProductKey>
<TaskbarLinks>
<Link0>%ALLUSERSPROFILE%\Microsoft\Windows\Start Menu\Programs\Mozilla Firefox.lnk</Link0>
<Link1>%ALLUSERSPROFILE%\Microsoft\Windows\Start Menu\Programs\Google Chrome.lnk</Link1>
</TaskbarLinks>
<WindowsFeatures>
<ShowInternetExplorer>true</ShowInternetExplorer>
<ShowMediaCenter>true</ShowMediaCenter>
<ShowWindowsMediaPlayer>true</ShowWindowsMediaPlayer>
</WindowsFeatures>
</component>
<component name="Microsoft-Windows-IE-InternetExplorer" processorArchitecture="x86" publicKeyToken="31bf3856ad364e35" language="neutral" versionScope="nonSxS" xmlns:wcm="http://schemas.microsoft.com/WMIConfig/2002/State" xmlns:xsi="http://www.w3.org/2001/XMLSchema-instance">
<DisableFirstRunWizard>true</DisableFirstRunWizard>
<DisableWelcomePage>true</DisableWelcomePage>
</component>
<component name="Microsoft-Windows-UnattendedJoin" processorArchitecture="x86" publicKeyToken="31bf3856ad364e35" language="neutral" versionScope="nonSxS" xmlns:wcm="http://schemas.microsoft.com/WMIConfig/2002/State" xmlns:xsi="http://www.w3.org/2001/XMLSchema-instance">
<Identification>
<JoinWorkgroup>tmccacad.tmcc.e</JoinWorkgroup>
</Identification>
</component>
</settings>
<settings pass="oobeSystem">
<component name="Microsoft-Windows-International-Core" processorArchitecture="x86" publicKeyToken="31bf3856ad364e35" language="neutral" versionScope="nonSxS" xmlns:wcm="http://schemas.microsoft.com/WMIConfig/2002/State" xmlns:xsi="http://www.w3.org/2001/XMLSchema-instance">
<InputLocale>en-us</InputLocale>
<SystemLocale>en-us</SystemLocale>
<UILanguage>en-us</UILanguage>
<UserLocale>en-us</UserLocale>
</component>
<component name="Microsoft-Windows-Shell-Setup" processorArchitecture="x86" publicKeyToken="31bf3856ad364e35" language="neutral" versionScope="nonSxS" xmlns:wcm="http://schemas.microsoft.com/WMIConfig/2002/State" xmlns:xsi="http://www.w3.org/2001/XMLSchema-instance">
<OOBE>
<HideEULAPage>true</HideEULAPage>
<NetworkLocation>Work</NetworkLocation>
<ProtectYourPC>3</ProtectYourPC>
</OOBE>
<UserAccounts>
<LocalAccounts>
<LocalAccount wcm:action="add">
<Password>
<PlainText>false</PlainText>
<Value>VwBpAG4AZABvAHcAxxxxxxxxxxxxxxxG8AcgBkAA==</Value>
</Password>
<DisplayName>F14admin</DisplayName>
<Name>F14admin</Name>
<Group>Administrators</Group>
</LocalAccount>
</LocalAccounts>
<AdministratorPassword>
<PlainText>false</PlainText>
<Value>VwBpAG4AZABvAHcAcwxxxxxxxxxxxxxxxxxxxxxxxxxxxxxxxxxxxxxxAHcAbwByAGQA</Value>
</AdministratorPassword>
</UserAccounts>
<RegisteredOrganization>tmcc</RegisteredOrganization>
<RegisteredOwner>staff</RegisteredOwner>
<AutoLogon>
<Password>
<Value>VwBpAG4AZABvAHxxxxxxxxxxxxxxxxxxxxAG8AcgBkAA==</Value>
<PlainText>false</PlainText>
</Password>
<Enabled>true</Enabled>
<LogonCount>3</LogonCount>
<Username>kpreper</Username>
</AutoLogon>
</component>
</settings>
<settings pass="generalize">
<component name="Microsoft-Windows-Shell-Setup" processorArchitecture="x86" publicKeyToken="31bf3856ad364e35" language="neutral" versionScope="nonSxS" xmlns:wcm="http://schemas.microsoft.com/WMIConfig/2002/State" xmlns:xsi="http://www.w3.org/2001/XMLSchema-instance">
<OEMInformation>
<HelpCustomized>true</HelpCustomized>
<Manufacturer>TMCC Helpdesk</Manufacturer>
<SupportHours>8 - 5</SupportHours>
<SupportPhone>673-7800</SupportPhone>
<SupportURL>http://www.tmcc.edu/it/contact/</SupportURL>
<Model>Compuiter Support</Model>
</OEMInformation>
</component>
</settings>
<cpi:offlineImage cpi:source="catalog:c:/w7image/install_windows 7 enterprise.clg" xmlns:cpi="urn:schemas-microsoft-com:cpi" />
</unattend>
Bat - Acad F14 post1 cleanup and Join Domain

net start w32time
%SystemRoot%\system32\w32tm /config /update /manualpeerlist:tmccacad.tmcc.edu /syncfromflags:manual

c:\windows\w2d\ksleep 10

net user administrator /active:yes
net localgroup administrators f14admin /add
net user administrator xxxxxxxxxxxx

reg.exe add "HKLM\SOFTWARE\Microsoft\Windows NT\CurrentVersion\WinLogon" /v AutoAdminLogon /d 1  /f
reg.exe add "HKLM\SOFTWARE\Microsoft\Windows NT\CurrentVersion\WinLogon" /v AutoLogonCount /t REG_DWORD /d 10  /f
reg.exe add "HKLM\SOFTWARE\Microsoft\Windows NT\CurrentVersion\WinLogon" /v DefaultDomainName /d tmccacad  /f
reg.exe add "HKLM\SOFTWARE\Microsoft\Windows NT\CurrentVersion\WinLogon" /v DefaultUserName /d install  /f
reg.exe add "HKLM\SOFTWARE\Microsoft\Windows NT\CurrentVersion\WinLogon" /v DefaultPassWord /d xxxxxxxxxxxxx /f
reg.exe add "HKLM\SYSTEM\CurrentControlSet\Control\Session Manager\Enviroment" /v LSFORCEHOST /d ms-vdf.tmccacad.tmcc.edu  /f
reg.exe add "HKLM\SOFTWARE\Microsoft\Windows\CurrentVersion\Authentication\LogonUI\Background" /v OEMBackground  /t REG_DWORD /d 1 /f

del C:\Users\Default\AppData\Local\Microsoft\Windows\webcache\*.* /f /q
del C:\Users\Default\AppData\Local\Microsoft\Windows\*.log1 /f /q /a:hs
del C:\Users\Default\AppData\Local\Microsoft\Windows\*.log2 /f /q /a:hs
del C:\Users\Default\AppData\Local\Microsoft\Windows\*.blf /f /q /a:hs
del C:\Users\Default\AppData\Local\Microsoft\Windows\*.regtrans-ms /f /q /a:hs
del C:\Users\Default\AppData\Local\Microsoft\Windows\Explorer\*.* /f /q
del c:\users\default\downloads\*.* /f /q /s

"C:\Program Files\Microsoft Office\Office15\ospprearm.exe"
cscript "c:\program files\microsoft office\office15\ospp.vbs" /act
cscript %SystemRoot%\System32\slmgr.vbs -ATO

start /wait cscript.exe c:\windows\w2d\join_domain.vbs tmccacad.tmcc.edu install password

c:\windows\w2d\ksleep 20
Bat - Acad F14 post2  Kace and reg keys

c:\windows\w2d\ksleep 10

start /wait msiexec /i "\\kbox.tmcc.edu\client\agent_provisioning\windows_platform\ampagent-6.2.1020-x86.msi" HOST=kbox.tmcc.edu /qn

start /wait reg.exe add "HKLM\SYSTEM\CurrentControlSet\services\Tcpip6\Parameters\" /v DisabledComponents /t REG_DWORD /d 4294967295 /f

start /wait net user kpreper /delete
Bat - Acad F14 post3 DR-vdf DeepFreeze install

reg.exe add  HKLM\SOFTWARE\Microsoft\Windows\CurrentVersion\RunOnce /v setthaw /d "dfc password /BOOTTHAWED"

"\\dr-vdf\DeepFreeze 8\F14\PCs\DR-workstation.exe" /install
Do not hesitate to post questions, The techs on ITNinja will either point you to training content or post the info you need.


Comments:
-
windows 7 has a undocumented feature I discovered. When a machine comes out of sysprep the discovery engine looks at c:\windows\inf for drivers. I created a subdir under that on my master called tmccdrivers and under that I create subdirs for every model of computer we have and put that models drivers there. Currently about 6 desktop and 6 laptop models. If you are worried about disk space (I use about 4-5gig for all my extra drivers) run a post task to delete the directory. that is what this blog covers.
http://www.itninja.com/blog/view/creating-a-windows-7-sysprep-image-without-having-to-install-any-drivers-at-post-install-tasks - SMal.tmcc 9 years ago -
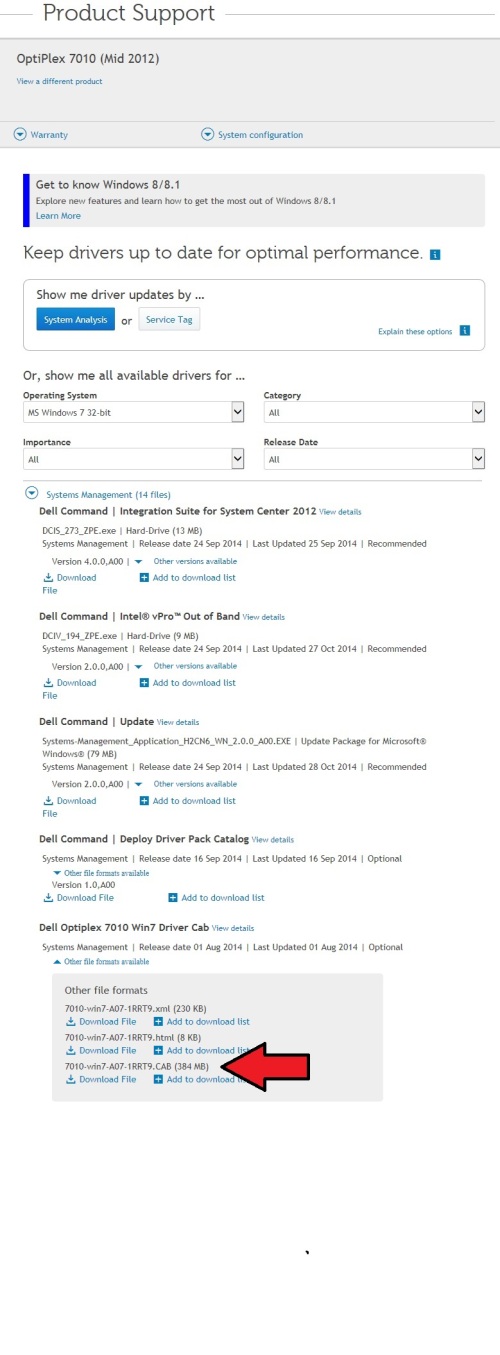
The best drivers to go get for the systems you have are the driver packs listed under systems management, they contain all the drivers that model needs. I usually download the cab packs and expand that with 7-zip and place that expanded structure in c:\windows\inf\tmccdrivers - SMal.tmcc 9 years ago
-
Nice work!! Slick method of getting those on there.
I'm gonna work on getting a master image sysprepped and ready to go. Really, really great stuff you've suggested. So cool. Thanks!! - murbot 9 years ago -
When you say the best drives [for my systems] are under system mgt, what do you mean? I mean where is the system mgt to which you are referring?
Do you mean in Device Mgr? Are you getting each driver name by expanding each line on each device one at a time or is there a list or group of drivers to download? Basically, how are you building the list of drivers and where do you download them? I usually get them from support.dell.com. - murbot 9 years ago-
under the support site for each product is a catagory named something like system management, this is what dell calls that section. Other manufactures may name it different but look for this driver set for all systems if possible, then you only need to download one file and expand that for each model. See other ans for pic - SMal.tmcc 9 years ago
-
If you are worried about disk space you can store your wims on windows shares. this has many advantages. I have blogs for each kace version on how to do this. http://www.itninja.com/blog/view/wim-storage-freeing-up-space-on-your-k2000-if-you-are-using-wims-k2000-version-3-6 - SMal.tmcc 9 years ago
Comments:
-
I had this working. Saved an offboard image and deployed it to another machine of the same model.
I added some more drivers to the inf folder and sysprepped it. When I tried to boot to the kbe, it get to the point of mounting the install shares and has 2 lines under that which say it completed successfully, then says "T: was deleted successfully", then goes to a Dell Kace logo screen and reboots the computer and starts up the sysprepped system.
I've gone through this 10 times today with new kbe's with different names each time. I clean up the old kbe's in between.
Any idea why it's rebooting there? - murbot 9 years ago