
I've always captured my images off of a VM. It's easier for me to update by loading a snapshot, and running MS updates. When we received some Surface's I realized I could no longer do this given my current setup. Reading around it seemed the only way to maintain these was to capture the image off the actual device. Which took too long for me. I used VM Workstation 9.0.3 build-1410761 in this.
First create your KBE as you usually would for Win 8. After you create it download the bootable .iso under Deployments>Boot Environments. After you download the .iso mount it to show all the files. I used http://www.slysoft.com/en/virtual-clonedrive.html to accomplish this. Format a USB, and copy these expanded files to the USB.
Second create a VM. Edit your .vmx file with notepad to include this line.
firmware = "efi"
This will allow UEFI. Create your VM as you normally would choosing to install an OS later. Power on your VM to BIOS. You will see it will try and boot, but it will fail. Plug in your USB at this time, and make sure your USB is connected to this VM (VM>Removable Devices>"USB Drive">Connect (disconnect from Host)). Shut down the VM. When powering back on select "Power on to BIOS". From there select your USB with your KBE on it. This will boot to the K2.

From there I used a scripted install to get Win 8 on the VM. Customize the image the way that you need it (Metro/MS Updates etc.). I then placed my unattend.xml along with a .bat file that runs sysprep under "C:\Windows\System32\Sysprep". Make sure your USB is still connected to the VM, and not the host. At this point I take a snapshot with todays date. After the snapshot is complete I run the .bat that runs sysprep, and then shuts down the VM.
After the VM has shutdown power it back on again. Make sure to "Power on to BIOS". From there select your USB again, and boot to the K2. Once it's booted, capture your image as you normally would.
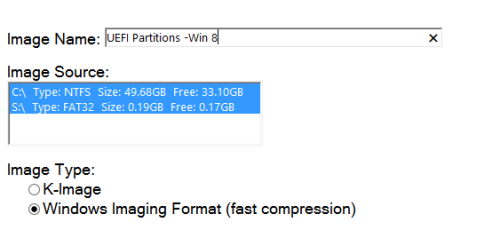
Once the image has uploaded I used the default "Create UEFI Partions" and "Format C:" for the preinstall tasks. As a mid-level I have "Apply UEFI Partitions". After the post install tasks have been assigned image your machine as normal.
Doing it this way has helped me keep my images current. Every couple of months I simply load my snapshot, run MS updates (unattend.xml turns auto updates off), and then run my .bat file the syspreps it.

I can get it to work in vmware workstation, however, I thought it would be handy if I could get it working in my vsphere environment.
I'll let you know if I get it working. - nlieschke 9 years ago
I am just using a crude USB in a single host method for KBE booting. I have set up a DRS rule so that any VM which requires KBE booting will stay on that particular host. - nlieschke 9 years ago
Same setup works fine on a physical machine. Its driving me nuts. Same issue with windows 7 & 10 - Daikonran 8 years ago
I was until now using the preinstall tasks which worked fine, but since i hit this issue, i decided to make a custom unattend. Will be testing it out tomorrow. - Daikonran 8 years ago
It's been a while since I've wrote this. I will say I am still using this process even with Windows 10. - dugullett 8 years ago