
Home > Reviews > LANDesk Management Suite 8.0
LANDesk Management Suite 8
by Bob Kelly
Overview
LANDesk is one of those desktop management suites that does it all. I, for one, am always skeptical of suites that “do it all” because it often means that certain features are noticeably lacking. It seems that all too often features are added simply to boost the length of the feature list and, to a disappointingly lesser extent the value of the suite as a whole. I am happy to say that this is not the case with LANDesk Management Suite 8, which has somehow managed to provide a very long list of features while maintaining a very well thought out implementation for each.
Installation
Instead of simply listing requirements, a nice front end is provided that checks for requirements and notifies if you have met them or not (see image at right). If any requirements are not met, download links to Microsoft’s website are provided to help you obtain them. Installation requires Windows Server (NT/2000/2003) and the system must not be a domain controller on the network. Once requirements are met and you begin the installation, setup prompts for a Windows NT 4 Server CD so it may obtain files from the \CLIENTS\MSCLIENT\DISKS directory. You are also prompted to provide a licensed Windows 98 CD so it can obtain files from BASE5.CAB. In each case, you must browse to the specified directory. While the reasons may be good ones, I found it odd to have to provide Windows NT Server and Windows 98 CDs during installation of a product on a Windows 2000 server. Additionally, having to navigate to paths on the disk that were documented in the dialogs seemed like an unnecessary inconvenience that could have been better automated.
Getting Setting Up
From device discovery, I used the Scan Network option to find computers on the network. You may choose from scan options including CBA (common base agent) discovery, NT Domain, Network Scan, or LDAP. Further, you may filter by IP range and even schedule the operation as a new task. I used the NT Domain method and was able to specify alternate credentials to perform the search.
You can create any number of client configurations and set one as default. From this configuration, you can choose which components you wish to install. This list of components provides a good quick-look at the LANDesk features, so I will briefly go over each of them here:
- Application Healing - Automatically keeps configured applications running on clients. You would use this to protect critical or commonly-used applications.
- Application Policy Management - Automatically installs a set of applications on groups of clients. You would use this to manage groups of clients that have common software needs.
- Bandwidth Detection - Enables bandwidth detection between clients and the core server. You can limit Management Suite actions, such as Software Distribution, based on available bandwidth. You would use this option if you have remote clients or clients that connect to the network via a slow link.
- Common Base Agent - Installs the CBA that forms the basis of communication between clients and the core server. This you would install on most clients as most of the other components listed here require the Common Base Agent.
- Custom Data Forms - Presents a form to users for them to complete. You would use this to retrieve customized information from users directly. Additionally you can query the core database for the data users enter.
- Enable Migration Tasks - Selects the components necessary for OSD and Profile Migration: Bandwidth Detection, Common Base Agent, and Enhanced Software Distribution.
- Enhanced Software Distribution - Automates the process of installing software applications or distributing files to clients. This is used to install applications simultaneously to multiple clients or to update files or drivers on multiple clients.
- Inventory Scanner - Gathers software and hardware information for clients that you can view through database queries.
- Local Scheduler - Allows Application Policy Management and Task Completion to be run on clients at specified times. You would install this if you did not want the Application Policy Management or Task Completion agents to run at login or if you wish the agents to run more or less frequently.
- Remote Control - Lets you take control of a client or server from across the network.
- Software Monitoring - Monitors and reports on software license usage.
- Targeted Multicasting – This adds Targeted Multicast support for Enhanced Software Distribution, Application Policy Management, Application Healing, OS Deployment (imaging), and so on.
- Task Completion - Checks with the core server to see if there are any tasks the client needs to run. You would use this with intermittently connected clients such as mobile users to make sure they get scheduled tasks.
Note: the only component not selected by the provided default configuration is Application Healing. 
Each component may be configured and the options provided (while too extensive to go through here) are quite granular with special attention paid to security and bandwidth concerns.
Pushing clients gave me a bit of trouble at first because you must have the CBA component on the client in order to schedule a client installation. After scanning the documentation I found that you can use an authorized domain account by setting the scheduler logon account, which by default is set to LocalSystem. Once this was changed to a valid domain admin account, all clients deployed quickly and without error.
![]()
Inventory
The inventory comes with a large database of files it can identify. Obviously you can add to this, but this large database gets you off to a great start by including information on many common commercial applications.
Asset reports (click here for a screen shot) are a very valuable feature taking advantage of Inventory data. You can select a single machine, a group of machines or all machines and generate asset reports. There are quite a few provided asset reports, and if you select one that requires a specific vendor, user, application, etc. – it presents you with a dynamic tree-view of valid responses. This is a great feature when I think to similar  systems that simply provide a text box to type into, and you hope you get it right. The report is created based on your criteria and you can double-click items to generate a secondary report on that item. Finally, the reports may be exported to a Crystal Reports (.rtp) file, a PDF document, an Excel spreadsheet, a Word document or a rich text document (.rft).
Also taking advantage of this Inventory data is the ability to create Queries, which you may use as collections/groups of machines for reporting or management tasks. Any of the information available may be used as a condition of the query you are creating and a very helpful feature is provided which optionally presents a returned set of values for the selected item. See image at left.
Remote Control
Remote control also looks very good. A nice log view at the bottom of the screen documents everything. You can perform any of the actions you would expect from an enterprise remote control utility: chat, file transfer, reboot, and remote execution (which is provided as a very handy toolbar drop-down option that  remembers previous commands you have executed). There is another drop-down list that allows you to switch between other active remote control sessions. Rather than filling your screen, the remote client desktop is presented in a resizable window which limits your current view based on the window size. When you move your cursor to the bottom or side of the desktop and there is room to scroll- the cursor turns to an arrow and easily scrolls the view accordingly (with varying speed based on your proximity to the edge of the window). At the same time, you do not loose any real estate to the far less accessible scroll bars you would see in a standard window to small to present its contents.
Performance settings allow you to suppress the client desktop wallpaper and color depth may be reduced using a slide control, which allows you to adjust the color resolution in order to affect the speed of your remote control session. In testing, the 10 Mbps LAN speed provided a responsive experience with negligible lag time.
Package Creation
The Package Builder application is not installed anywhere by default because LANDesk promotes the idea of establishing a clean machine to perform these actions. The installation files for the Package Builder are provided in a share on the LANDesk server. I went to a clean machine and ran the installation over the network.
 Running the Package Builder Wizard takes you through a typical before/after snapshot process which I am assuming you are familiar with already. The process was very simple and streamlined and provided no exclusion lists to verify or package contents. It merely prompted for the name of the application – in this case the Google toolbar.
When choosing to modify the package, you are warned that you must leave the Package Builder Wizard to do so and that you will need to build your package manually using Builder. “Builder” provides a powerful set of features (which I found surprising after witnessing the simplicity of the Builder Wizard). It provides a very intuitive set of form-controlled functions to help you create/modify your installation script.
 The Package Builder generates installation packages as EXE files and does not provide an option for generating an MSI package. The only real negative thing I see here is that with the Wizard not providing an exclusion list or simple means of grooming your package after the snapshot, you really need to perform any package “cleaning” in the Builder application. While that in and of itself is not a bad thing, the Builder interface does not lend itself to easily viewing the contents of your package as a simple list of files and registry entries you can quickly delete. It is really more geared to authoring setups, than to modifying that created by the Builder Wizard. Finally, because it does not generate an MSI package, you do not have the ability to identify and remove unwanted items with PackageCleaner or easily import its contents in to any conflict management database you may have invested in.
Package Deployment
Deployment went smoothly in testing. The first step is to create a deployment script- which is really not as complicated as it sounds. A wizard requests the details of the deployment, prompting for an http or UNC path to the package you want to deploy. The script is essentially an INI file, which dictates the parameters of the deployment; you must then use the Scheduler to actually assign the deployment script to machines. Covering things quite well, the deployment script requests the following details about the package deployment:
- Install or Uninstall – As you would expect, this setting determines if the script should be installing or removing a software package.
- Multicast – if yes additional options to control the multicast are presented
- Additional Files – you may specify additional files to be distributed as part of the script
-
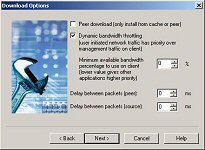 Dynamic bandwidth throttling – you can choose the percentage of minimum available bandwidth to use on the client (a lower value would give other applications more priority). Additionally, you can specify a delay between packets in milliseconds.
 - Distribution Limits – you can choose to use the default or custom distribution limit, which is a value indicating the number of devices to distribute to at a time.
- Feedback options – you can choose how the user will perceive the package installation. You may hide the UI from the user or display progress. Additionally you can choose to display a background screen and control if the user should be able to cancel the package or not.
- Reinstallation/Repair – If the package is already installed on the target client, you can choose what action the distribution should take: heal (repair) the package, perform a full reinstallation or allow the user to decide which of these two options should take place.
- Rebooting – This section allows you to specify if the package should never reboot, always reboot, or reboot only if necessary.
- Deployment Timing – While the time of the distribution will be set in the scheduled task, this allows you to select machine specific parameters. You may choose to delay the action until the next user logon. You may also allow the user to delay the action and specify a custom message to display and a timeout/countdown interval at which the action will take place if no decision is specified.
- Bandwidth – You can specify that a non RAS network connection is required. If you do, you can then specify if any non RAS network connection is to be required, or to only allow high speed network connections.

 When the wizard is complete, a summary of items is provided where you may click Finish to create the script or “Back” to make any changes. When scheduled, the Google Toolbar package showed a pending, active and complete list of machines where the target clients would move from list to list as they processed the job. See image at left. Two machines returned no error, and a third reported that it completed but that a reboot was still required (Internet Explorer had been running already at the time of the package installation).
With the Application Healing component installed, whenever an application fails to launch on a client Application Healing detects the problem. It will record it for reporting purposes, or (if the application is listed as one you wish to provide application healing support) the Application Healing agent uses the distribution package to reinstall components of that application. To minimize the use of network bandwidth, the healing process only copies missing, corrupt, or outdated files to the client.
OS Deployment
PXE and Client initiated OS image deployments are supported, as well as an integrated client/profile migration tool. Focusing on the image deployment itself, this describes an image deployment handled by the installed LANDesk client agent.
- Management Suite connects to the client and runs any pre-configuration commands you may have specified in the image deployment script.
- OS deployment uses LANDesk’s Enhanced Software Distribution agent to distribute a virtual boot partition file to the client and modifies the boot sector to boot from this file- and then reboots the client.
- The client boots to DOS, detects and loads a network driver, then retrieves and installs the image file from the image server.
- For non-Sysprep images, the client reboots after the imaging completes. OS deployment considers the job complete after this reboot.
- For Sysprep images, the deployment continues as described in steps 4 through 7:
- Before rebooting and loading the image, the DOS agent replaces SYSPREP.INF with a customized file for that client.
- The imaged client boots and customizes itself based on what is in the SYSPREP.INF file.
- Any post-image commands you may have specified in the image deployment script are run from the RunOnce registry key.
- Finally the LANDesk client is installed using your default client configuration.
When creating your OS Deployment script to create an image, you can even choose what imaging utility you wish to use: Ghost, PowerQuest, Other or LANDesk. I chose LANDesk, but still had to locate the network path to its imaging tool (which I found at “\\landesk1\ldmain\osd\imaging\IMAGE.EXE”). Like everything else, the wizards collected the information, with all the details you would hope to see fully accounted for.
Closing
LANDesk has it all covered. And its impressive set of features are not thrown together for the sake of boasting that they have it all covered. Every option I dug into asked all the right questions and presented everything I would want to see. The interface is excellent- both in terms of looks and functionality. Inventory reporting, asset reports, queries (to build collections of systems) were all top notch. Even the task reporting was excellent- when I would try to trip it up by turning off a machine during the image process, the status was quickly updated in the console to show a failure status (with a result of: “Ping: no response form target within specified time”). The evaluation copy provides a 45 day license for 100 clients and 5 servers- if you are evaluating products for desktop management, I strongly recommend including LANDesk in your evaluations. With its wide range of well thought out features, it is a likely winner for most any size organization.
Bob Kelly
3/12/04
AppDeploySM

Comments