
K2000 Image Deployment Failing
- Build up the Dell PC I want to image
- Sysprep the machine (I followed the steps listed here: http://www.itninja.com/blog/view/how-to-sysprep-windows-7-for-k2000-deployment)
- Reboot, capture the image of the machine (Windows Imaging Format)
- Log onto our K2000 server and configure the image to match the working images "Installation Plan" as per below:
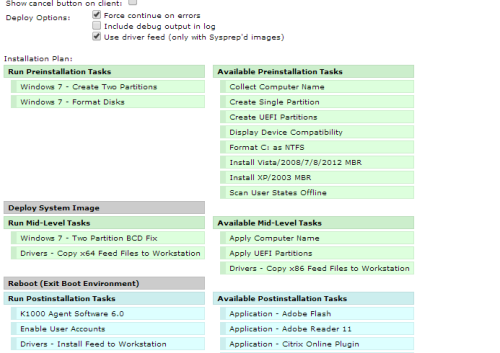 When I try to push the image to a machine I get an error saying that the boot manager is missing after the imaging process finishes. Prior to that I tried to capture an image of a computer that had been imaged with our working image. This also didn't work but I got a different error. When I tried to push this image out it would fail on the "Apply Image" step with an error saying that no OS could be found.
-
Thanks guys, will take your advice and test. We are running 3.6.98680 so will remove those old tasks. Will post back how I get on. Cheers - Joe27 9 years ago
-
Thanks everyone, got it working now. - Joe27 9 years ago
Answers (4)


I ran into this issue as well. When you build your model image, use this hack to remove the 100 Mb partition. Unless you use bit locker you don't need this.
- Once Windows 7 Setup is loaded, press Shift + F10 keys at the first setup screen (which allows selection of language, keyboard and locale). A Command Prompt window will be opened.
- Run Diskpart, the built-in disk partitioning tool of Windows 7 with the following command:
diskpart - Type in the following command one by one, follow by Enter key to create a partition (text in brackets are comments only):
list disk(to show the ID number of the hard disk to partition, normally is Disk 0)select disk 0(change 0 to another number if applicable)cleancreate partition primary size=80000(create a partition with 80 GB space; to use entire disk as one partition, omit the “size=value” parameter switch; use similar command to create more partition if needed or create in Windows 7 after installation)select partition 1activeformat fs=ntfs quickexit - Type exit at command prompt to close Command Prompt window.
- Continue Windows 7 installation as usual. Remember to just highlight and select the partition just created when come to partition screen.

Hi, we also had problems with two disks, the sysprep somehow tampers with the mounted devices.
So before you sysprep, open regedit and export HKLM/SYSTEM/MountedDevices key and leave regedit open (you cannot open it afterwards, so it's important that you leave it open).
Than open a command prompt "Run as Administrator" and run the sysprep command with /quit at the end (instead of shutdown or restart).
example: sysprep /oobe /generalize /unattend:C:\temp\unattend.xml /quit
Wait until it's finished and re-import the Mounted Devices key that youexported earlier again in the still opened regedit.
After that you can shutdown or restart the computer and capture the image.
hope this helps!
