[Previous Post] [Next Post] To capture attribute values from the OME email alert, the queue must be configured to accept these values on User Create. The fields that are configured in this way in the sample queue are:
· Title
· Impact
· Category
· Priority
· Machine
· Asset
· Custom_1 (we’ll use this to map Service Tag from OME in our example)
· Custom_2 (we’ll use this to map Asset Tag from OME in our example)
· Custom_3 (Create Date and Time from OME in our example) Of course, the desired attributes to collect from OME may be modified by editing the field configuration by clicking on the edit icon (pencil), and then configuring the appropriate mapping in the OME alert action. Let’s now take a look at how we create the alert action in OME. Take note of the Field Name and Label. Either of these names may be used to complete a mapping in OME, as we’ll see below. Warning: If a field label will be used in a mapping, make sure the label does not contain spaces (e.g. “Asset_Tag†rather than “Asset Tagâ€Â). While a field label may contain spaces in the K1000 user interface, data cannot be mapped via email if the name contains a space.
Create E-mail Alert action in OME OME has the capability to filter alerts that have been captured and forwarding filtered alerts to external applications, email, forwarding the SNMP trap to yet another console. In the case of the K1000 Service Desk, we’ll use the email configuration to manage the integration. Within the OME console, select Manage -> Alerts In the left pane, select Alert Actions-> Email Right click on Email and select New Email Alert Action OR right click on one of the sample pre-canned alert action and select Edit. [font="times new roman"]
In Name and Description, provide e-mail alert action name and description. Check Enabled checkbox and Click [Next]. [font="times new roman"] In E-mail Configuration, provide the recipients of this e-mail and sender in To: and From: address fields. Make sure the To: e-mail address in OME matches Email Address in KACE Service Desk Configuration (or the Alt Email Address if you are using a different alias in your email system and forwarding email to the Service Desk Queue. The From: address will receive confirmation and/or error messages back from the K1000, so make sure this is a valid email address. Note: Separate each recipient or distribution list with a semi-colon. During testing, you can supply your own email address to confirm email messages are being sent out from OME. You may also want to use your own email address as the From: during testing to see the confirmation or error messages that may be getting generated. Provide a Subject. You may use the pre-defined alert substitution parameters provided by OME in the subject. You should consider how you want to process the alerts within the service desk as part of defining your subject, as these will appear in the list of tickets for the queue and should be readily identifiable according to the criteria that is important to you. In the Message field, create a map of KACE service desk and OME pre-defined alert substitution parameters. For each of the supported parameters the Email alert action fetches alert data and assigns it to the corresponding parameters on KACE Service Desk. For example:
Warning: Parameters prefixed with “@†are defined in the KACE Service Desk. Parameters prefixed with “$†are defined in OME and are substituted with actual value when E-mail alert action is triggered. The email body MUST begin with an “@†for the K1000 appliance to recognize that attributes are being mapped. If any text appears in the message body before the first “@â€Â, all subsequent data mappings will be ignored. Note: If the computer being monitored has the K1000 installed, mapping @machine=$n will result in the link to that machine in inventory appearing in the resulting ticket. This is especially useful when resolving tickets. Also, if a non-computer device is being monitored (e.g. switch) and that device has been configured in the K1000 Asset module, then the link to the asset will appear in the ticket. Also, be sure to include the “$m†attribute at the end of the email. This is the text associated with the alert and will be added in the comments section of the ticket so the administrator knows what issue needs to be solved.
Click Email Settings and provide SMTP server name or IP Address. Make sure to test the feature using the Test Action button. This should send a sample e-mail to the all the recipients. Click [Next].
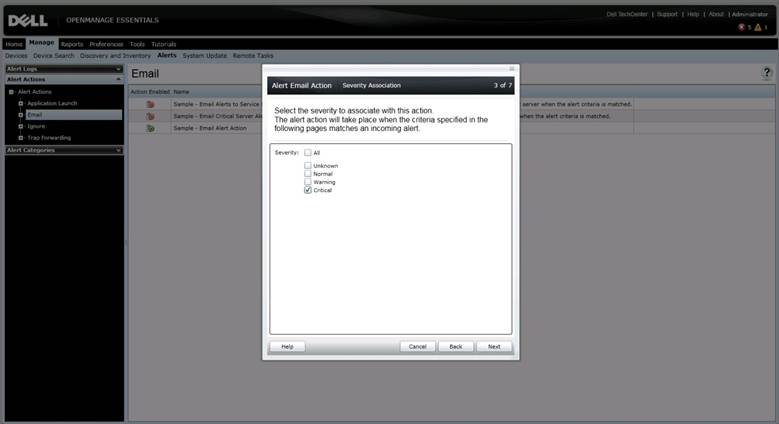
In Severity Association, assign the alert severity to which you want to associate this e-mail alert. This allows you to filter the alerts that have been raised in OME to only those that are of a sufficient severity to warrant remediation in the K1000. In the imported queue configuration on the K1000 these values have been configured for the Priority of the ticket. Click [Next]. In Categories and Sources Association, assign the alert categories source to which you want to associate this e-mail alert. In the imported queue configuration on the K1000 these values have been configured for the Category of the ticket. If you customize the categories within OME, you should also modify the category values in the service desk queue on the K1000. Click [Next].
This topic is continued in the next post, or you may return to the prior post of this topic.
This website uses cookies.
By continuing to use this site and/or clicking the "Accept" button you are providing consent
Quest Software and its affiliates do NOT sell the Personal Data you provide to us either when you register on our
websites or when you do business with us. For more information about our
Privacy Policy and our data protection
efforts, please visit
GDPR-HQ