
With the new release of our K1000 version 5.4, we now have the ability to manage Ubuntu Clients. In this guide, we will review the process of installing the K1000 agent on an Ubuntu client manually.
NOTE: Only versions 10 LTS and 12 LTS are supported. Other versions and other distributions based on Ubuntu may work but are not supported. Please note, this guide was written specifically for agent version 5.4.5315 on Ubuntu version 12.04 LTS. 10 LTS may vary.
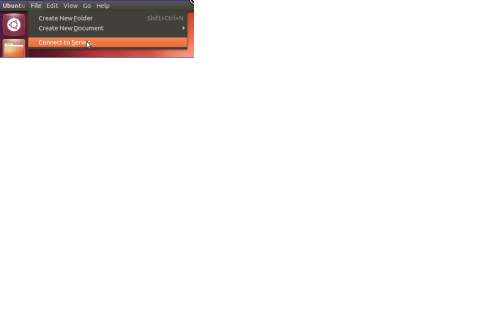
1. On the Ubuntu system, hover over a blank spot on the Ubuntu Desktop title bar. Click File>Connect to Server
2. Change the type to Windows Share:

3. Type in the K1000 name or IP Address for "Server". (see screenshot below for steps 3-7 below)
4. For "Share", type "client”
5. For "User name", put in "admin". This uses the normal Samba share credentials.
6. For "Password", put in the Samba share password.
7. Click "Connect".

NOTE: The prompt may pop up with "Workgroup" under Domain. Clear it and click Connect again.
8. You will see the client folder for the K1000. Navigate to agent_provisioning\linux_platform. Please note that the client folder is mounted under the Network locations in the screenshot below.

9. Select the installer for the architecture that matches the Ubuntu install. Using "uname -m" in terminal will determine this.

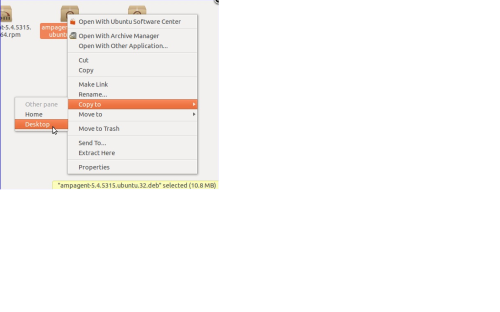
10. Right-click on the proper installer and select "Copy to" and select "Desktop".
11. Open terminal by clicking on Dash Home and typing "terminal" in and pressing Enter. Terminal may show up below as well.

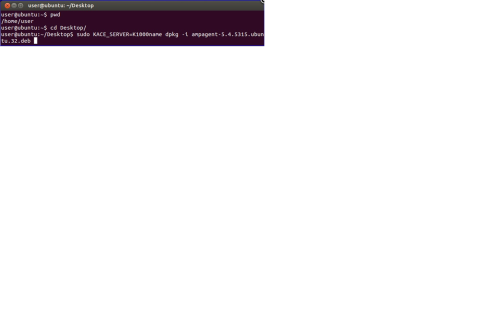
12. Terminal should default opening at /home/"username", which in this example is /home/user. You can use the command "pwd" to determine exactly where you are. (Please see screenshot below for steps 12 and 13 below)
13. Assuming you are at /home/username, type in the following instructions (pressing enter after each line and substituting the actual K1000 name for "K1000name"):
- cd Desktop
- sudo KACE_SERVER=K1000name dpkg -I ampagent-5.4.5315.ubuntu.32.deb
14. The agent will install at this point and should check into the K1000 successfully. Delete the agent from the desktop and unmount the K1000 client share from the Ubuntu system.

Comments